
Getting started
Nxt is an open source second generation blockchain that provides tools for a decentralized financial platform. Coded in Java completely from scratch, Nxt was the first currency to rely purely on proof-of-stake for consensus.
Download Nxt
Nxt is supported by all major operating systems. Before we begin, if you haven’t already done so, you may wish to check that you have the correct (usually most recent) version of Java installed on your computer. You can use any compatible Java available for your platform. The minimum required version is Java 8. The recommended version is Java 11. We usually test with OpenJDK 11.
To start with Nxt, you need to have the Nxt client software installed and up to date. You can find the download and installation instructions of the core Nxt client as follows:
 |
 |
 |

|
Client Installation
- Download the Windows installer for the latest official Nxt Client 1.12.2 from https://www.jelurida.com/nxt-client.exe.
After downloading, verify its signature
- Run the installer and follow the instructions on screen. Icons will be created by default in your desktop and Start Menu.
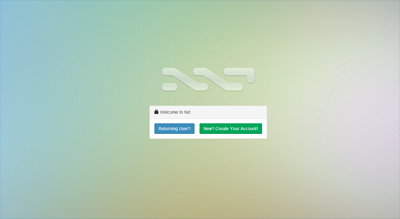
- You can now run the Nxt software.If you already have created a Nxt account, click in 'Returning User' to introduce your passphrase. If you need to create your Nxt account, click here for instructions to Create a New Nxt Account.
- Download the Mac installer for the latest official Nxt Client 1.12.2 from https://www.jelurida.com/nxt-installer.dmg.
After downloading, verify its signature and check the SHA256 hash of the package for security.
- Run the installer package (Nxt's Mac installer comes packaged in .dmg format) and follow the instructions on screen
- Open the nxt-installer.app and click on the "Open" button
- Select the language
- Click on 'Next' to begin with the installation
- Accept the terms of the license agreement
- Select the installation path
- Check the options
- Once installed, click on finish
- You can now run the Nxt software clicking on the "Nxt.app" in Applications. If you already have created a Nxt account, click in 'Returning User' to introduce your passphrase. If you need to create your Nxt account, click here for instructions to Create a New Nxt Account.
Here is the guide to installing the Nxt Client on a Linux 64-bit platform. 32-bit installation instructions are very similar; you just might need to download the 32-bit version of Java instead of the 64-bit one.
You can use this instructions on your Linux VPS as well (but also see our public node installation instructions ).
Set up Java
You can skip this step if you already have Java installed. Otherwise, you can install it via PPA repository doing the following (for Ubuntu/Debian builds):
sudo apt update
sudo apt install openjdk-11-jre-headless
Install and run the Nxt Client
Find below the instructions for installing the software.
Using the Universal Zip Package
- Change to your home folder and download the latest client (version 1.12.2):
cd ~wget https://www.jelurida.com/nxt-client.zip- SHA256 hash - d5d48729a1f32b8c11066bcdb203dd7760a582896afe8d2506feb93cf833f606 nxt-client-1.12.1.zip
- SHA256 hash -
- Unzip it:
unzip nxt-client-1.12.2.zipcd nxt
Using the Unix installer
You can execute the unix installer executable compatible with most linux distributions from nxt-client.sh and follow the instructions.
wget https://www.jelurida.com/nxt-client.sh
sh nxt-client.sh
Run the Nxt client
- Now it's time to start the software. You may start it by executing
./run.sh, which you will find in the nxt directory. The server will be active as soon as you see in the window a text similar to this:Nxt server 1.12.2 started successfully.This shell window will be running the Nxt server and print all the Nxt log messages, so it needs to stay running! - Open http://localhost:7876/ from a web browser to access the Nxt Client. Please note that, if it's the first time you run Nxt in your machine, the Nxt blockchain will need to be downloaded until it is up to date. Depending on the your network connection speed, this may take a few hours. The Nxt Client will show you a progress bar as the blockchain downloads. Now you can visit the instructions to create your Nxt account!
- NOTE: If you've installed the client on a dedicated server or VPS, you should change "localhost" to your Server/VPS IP.

(Originally created by barbarosinciler at nextcoin.org . If this is of value to you, please donate some Nxt to him at address 7121642459245273749. The Java package that installs Nxt on your Pi was written by davethetrousers, at 14923118471272229432)
Raspbian and the NRS client for Nxt both run very well on a Raspberry Pi. CPU usage is approximately ~15-20% with the web client open and an account unlocked. Without the web client open (still unlocked) it is less than ~10% most of the time (it occasionally peaks higher and MAY occasionally spike to full load). Memory usage is about 100MB
Once this software is installed on your Raspberry Pi, it will start automatically on boot. You can administer it using remote desktop from another PC.
This tutorial makes the following assumptions; adjust accordingly!
- your installation PC's is running Windows and has an IP of 192.168.1.20
- your network router's IP is 192.168.1.1
Basic Raspbian install guide
- download and install Raspbian
- Download the Raspbian image from [1]
- Download diskimager for windows [2].
- Install image on an SD Card, and boot the Raspberry from the card. You should see a config menu.
- Expand filesystem and change your password.
- Enable boot to desktop.
- Set internationalisation options (language, keyboard and timezone)
- Under advanced options enable ssh and set a hostname like "rpi".
- Reboot. Now you should see a desktop and the system is running
Update the system
- open the bash commandline (LXTerminal), type the following, and follow the instructions:
sudo apt-get upgradesudo apt-get dist-upgrade
- Check your IP configuration
- Your Pi should pick up an IP address from DHC, and this can be confirmed with the
ifconfigcommand in a shell. To configure a static ip, open the bash commandline (LXTerminal) and type the following:sudo nano /etc/network/interfaces
- Change the following entry from:
iface eth0 inet dhcp
To:iface eth0 inet staticaddress 192.168.1.10netmask 255.255.255.0gateway 192.168.1.1network 192.168.1.0broadcast 192.168.1.255 - Press CTRL and O at the same time to save the file
- Press CTRL and X together to exit
- Reboot your Pi
- Your Pi should pick up an IP address from DHC, and this can be confirmed with the
Install XRDP (RDP server)
- Open the bash commandline (LXTerminal) and type the following, and follow the instructions:
sudo apt-get install xrdpsudo apt-get upgrade xrdp
- Now you can use Microsoft Remote Desktop and work remote on the Raspberry.
- In windows go to start -> open -> and type "mstsc"
- Enter your Raspberry's address (192.168.1.10), connect and sign in with your password
Router/firewall port forwarding
- Make sure to forward TCP port 7874 tcp on your network router to the IP your raspberry has (192.168.1.10)
Install NXT Client
You have two possible options here:
- Use your Raspberry Pi with the standalone package Oracle JRE included (all credits to the author: davethetrousers )
- Download the
tar.gzfile from davethetrousers' mirror with wget and extract it:wget http://109.230.224.65/~nxt/nxt_rasppi.tar.gztar -xf nxt_rasppi.tar.gz- To start NRS automatically on raspberry reboot edit the run_nxt.sh file in nxt folder:
nano nxt/run_nxt.sh
- Copy the code located at the end of this section, and paste it into your file.
- Press CTRL and O at the same time to save
- Press CTRL and X together to exit.
- Enter:
crontab -e - Insert the code at the end of the file:
@reboot /home/pi/nxt/run_nxt.sh start - Press CTRL and O at the same time to save
- Press CTRL and X together to exit.
- Now the raspberry should be able to load the NRS software on boot
- Download the
- Step by step installation from devs mirror with build in raspbian java
- Download the NRS client (current version: 1.12.2) https://www.jelurida.com/nxt-client.zip
- SHA256 hash - d5d48729a1f32b8c11066bcdb203dd7760a582896afe8d2506feb93cf833f606 nxt-client-1.12.1.zip
- SHA256 hash -
- Download the NRS client (current version: 1.12.2) https://www.jelurida.com/nxt-client.zip
- Unzip the file:
unzip nxt.zip - Now the NRS client is in your home folder (
/home/pi/nxt/) - Enter:
crontab -e- Insert the code at the end of the file:
@reboot /home/pi/nxt/run.sh - Press CTRL and O at the same time to save
- Press CTRL and X together to exit.
- Insert the code at the end of the file:
- Now the raspberry should be able to load the NRS software on boot
- Unzip the file:
Stop script for the Nxt software
- Create a new file in the /home/pi/nxt/ folder and name it something like "stop_nxt.sh":
nano nxt/stop_nxt.sh- If you are using davethetrousers' Java package, enter this code:
/home/pi/nxt/ejre1.7.0_45/bin/java -Xmx1024M -cp nxt.jar;lib/*;conf nxt.Nxt STOP.PORT=11111 STOP.KEY=123456 --stop - If you downloaded the Nxt software directly:
/usr/bin/java -Xmx1024M -cp nxt.jar;lib/*;conf nxt.Nxt STOP.PORT=11111 STOP.KEY=123456 --stop
- If you are using davethetrousers' Java package, enter this code:
- Press CTRL and O at the same time to save
- Press CTRL and X together to exit.
Now you can stop the client on bash command line with the following command:sudo bash nxt/stop_nxt.sh
Before reboot your Pi, you should use this script to prevent a blockchain error!
Now you can reboot the system with:sudo reboot
Connecting from your PC instead of localhost
- Create a
nxt.propertiesfile under thenxt/conf/folder. You can create the file from command line using the commandnano nxt/conf/nxt.propertiesand write the following in it. Make sure to modify the IP accordingly to yours:nxt.allowedBotHosts=127.0.0.1; localhost; 192.168.1.20; 0:0:0:0:0:0:0:1;nxt.allowedUserHosts=127.0.0.1; localhost; 192.168.1.20; 0:0:0:0:0:0:0:1; - Press CTRL and O at the same time to save
- Press CTRL and X together to exit
Manually start forging with the NRS client
To start forging you will need to be logged in with your web browser once.
- Open http://192.168.1.10:7876
- Unlock your account with your passphrase (unlocking an address takes a few seconds).
- If on the left side, next to the red dot, it says "Not forging", click it to start.
- Now you can close your browser. It will keep forging.
Handling NRS and Java errors
You can check the java logfiles (nxtout.txt and nxterr.txt) in the nxt folder for errors!
Having issues?
Check the Faq and the "common problems and resolutions" pages!
Additional useful commands and tools
Mount your local windows hard drive remotely, for Raspberry Pi data sharing
sudo mount -t cifs //192.168.1.20/c$ /mnt -o user=myusername
Where:
- x = The IP address of your Windows PC
- myusername = your username on the windows PC
sudo raspi-config
Check the built-in Java configuration
sudo update-alternatives --config java
(The standard location is marked with a star, and the path is something like /usr/lib/jvm/jdk-7-oracle-armhf/jre/bin/java/ The defaults are priority = 317 and auto-modus. If that is ok, confirm by pressing Enter.
Remote administration with putty
You can manage your raspberry with the tool "putty" through a command line SSL connection. Download the tool from [3]
run_nxt.sh file
Use the following code in your run_nxt.sh script:
#!/bin/bash
### BEGIN INIT INFO
# Provides:          NXTserver
# Required-Start:    $local_fs $remote_fs $network $syslog $named $sshd
# Required-Stop:
# Default-Start:     2 3 4 5
# Default-Stop:      0 1 6
# Short-Description: Start/stop NXT server
### END INIT INFO

if [ `id -u` != "0" ] && [ "$1" = "start" -o "$1" = "stop" ] ; then
  echo "You must be root to start/stop nxt."
  exit 1
fi

# Settings
nxtdir=/home/pi/nxt
nxt=nxt.jar
java=/usr/bin/java
nxtpid=/var/run/nxt.pid
nxtlog=/home/pi/nxt/nxt.log
nxtuser=pi
nxtgroup=pi
nxtnice=19
timeout=700
maxmem=120
# end Settings

# check for exist files and dirs
test -d $nxtdir || exit 0
test -f $nxtdir/$nxt || exit 0
test -f $java || exit 0

# make sure $nxtdir is ours!
chown -R $nxtuser:$nxtgroup $nxtdir

. /lib/lsb/init-functions

function status {

    start-stop-daemon -T --pidfile "$nxtpid" && echo "NXT server is started." \
    || { echo "NXT server is stopped." ; return 1; }

    return 0;
}

case "$1" in
    start)
        log_daemon_msg "Starting NXT server..." "" || true

        # check if server is running
        if [ -e $nxtpid ]; then
            pid=`cat $nxtpid`
            var=`ps -p$pid | wc -l`

            if [ $var -lt "2" ]; then
                # clear logfile
                echo -n > $nxtlog
            else
                echo -n " NXT server is already running!"
                log_end_msg 0 || true
                exit 0
            fi
        fi

        # Enable Debug for more info when starting NXT
        if cat $nxtdir/conf/nxt.properties | grep -q  "nxt.debug="; then
            if cat $nxtdir/conf/nxt.properties | grep -q  "nxt.debug=true"; then
                # Debug is enabled, nothing todo...
                echo -n ""
            elif cat $nxtdir/conf/nxt.properties | grep -q  "nxt.debug=false"; then
                echo nxt.debug=true >> $nxtdir/conf/nxt.properties
            fi
        else
            echo nxt.debug=true >> $nxtdir/conf/nxt.properties
        fi

        # n minute timeout.
        sleep $timeout &
        timerPid=$!

        # check log file and generate status-msg; will be killed when server is started or timeout hit
        tail -q -n0 -F --pid=$timerPid $nxtlog 2> /dev/null | while read line; do

            if echo $line | grep -q  "Scanning blockchain"; then
                echo -n " Scanning blockchain"
            elif echo $line | grep -q  "processed block"; then
                echo -n "."
            fi

            if echo $line | grep -q  "started successfully."; then
                echo -n "NXT server started successfully."
                log_end_msg 0 || true
                # stop the timer..
                kill $timerPid > /dev/null 2>&1
				$nxtdir/traffic_shaper.sh > /dev/null 2>&1
            fi
        done &

        # start server
        if start-stop-daemon --start --name nxt --nicelevel $nxtnice --chuid $nxtuser:$nxtgroup --pidfile $nxtpid -m --chdir $nxtdir --exec $java >> $nxtlog 2>&1 -- -Xmx"$maxmem"m -cp $nxt:lib/*:conf nxt.Nxt >> $nxtlog 2>&1 & then
            # wait for the timer to expire (or be killed)
            wait %sleep > /dev/null 2>&1
        else
            log_end_msg 1 || true
        fi
        ;;
    stop)
        log_daemon_msg "Stopping NXT server..." || true

        # check if server is running
        if start-stop-daemon --stop --pidfile $nxtpid > /dev/null 2>&1; then

            while status > /dev/null; do
                sleep 1;
            done

            echo -n " NXT server stopped."
            log_end_msg 0 || true
            rm $nxtpid  > /dev/null 2>&1
        else
            echo -n " NXT server is not running!"
            log_end_msg 0 || true
            exit 0
        fi
        ;;
    restart)
        $0 stop
        sleep 1
        $0 start
        ;;
    status)
        status
        ;;
    *)
        echo "usage:`basename $0` start | stop | restart | status"
        exit 1
        ;;
esac
Click on the Android Full Node installation guide and follow the instructions.
Start using the Nxt client
If you would prefer, you can first familiarise yourself with Nxt by playing around with the Demo.
- Create a Nxt account address
- Learn how the Nxt client software works
- Learn the Security Features of NXT
- Exchanges to get or buy some NXT
- Explore more features of Nxt
Need help?
Need help during the download or development process? Contact us on the slack #helpdesk channel, chat with community experts on the Nxt Forum. You can also reach us opening a ticket in our helpdesk
You can also ask community experts in the Nxt Forum or in the Nxt Slack (invites are here) or take a look at the NxtWiki FAQ
Getting your first NXT
The exchanges and tools where you can get NXT with CNY, EUR, USDT, BTC and other currencies are listed here.
With the Nxt client installed, it is now time to start transacting. To do that, we need to get some NXT tokens. The Nxt mainnet is live and actual tokens are in circulation across numerous major exchanges.
Note the tokens we will be using in the next examples are from testnet. These tokens are not traded in exchanges and have no monetary value -- they exist only as a convenience for developers and those willing to experiment with the features.
The process for receiving testnet tokens is simple. Ask for them in the Nxt Forum, contact us on the slack channel #helpdesk. There is an external faucet as well.
Next steps
Learn how to use the Nxt platform by following the basic guides or start reading about Nxt's extensive built-in Features.
Feedback and errors
If an error in this documentation is found, we would love to be aware to correct it as soon as possible. Please write a question to info@jelurida.com and we will take care.